Planning Missions
UgCS operates with Missions and Routes. A single Mission can include multiple Routes. At any given moment, only one Mission is active in the Main Window.
In the example below, the current active Mission is named Mission Test:
Key Concepts
- Mission: Represents a complete set of tasks or objectives for the drone.
- Routes: Individual paths or flight plans within a Mission.
Steps to Manage Missions and Routes
1. Create New Mission
- Allows the creation of a new mission, either from scratch or imported from a file.
- If "from scratch" is selected, the mission will be created automatically with one Route.
2. Open Mission
- Opens the list of already created missions.
- By choosing one, the user changes the active mission in the Main Window.
3. Edit/Stop Editing
- Switch between Edit and non-Edit modes by clicking here.
- To add new Routes, the user needs to be in Edit mode.
4. Remove Mission
- Removes the current active mission by clicking here.
5. Import Mission
- Allows the import of a previously stored mission.
6. Export Mission
- Allows the export of the current active mission.
The user can add a new Route to the current active mission by clicking on the Add New Route button.
To start planning the route click the Add new route button;
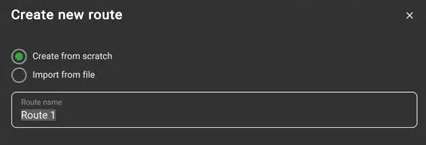
The “New route creation” window will be displayed. Leave “Create from scratch” marked, name the route and press “Next”;
Select the vehicle profile. Use the Quick Search option for faster navigation;
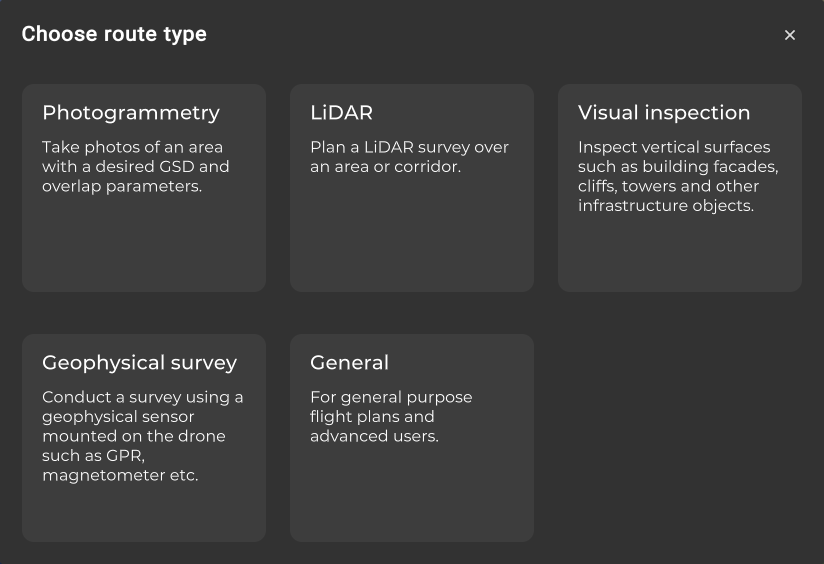
Select the mission type and subtype;
A new route card will be displayed with the specified name. You can now start designing the route!
Depending on the selected route type you can add segments on a map by double-clicking or “SHIFT+left click”.
Each Route's planning tool has an associated inspector window enabling to adjust parameters like coordinates, altitude, speed, etc., that will be considered during the calculation process. Also, the turn type and camera action settings can be adjusted.
To access the rest of the route parameters navigate to the “Route parameters” menu.
You can combine different Flight planning tools within one route.
The path-finding algorithm of UgCS will automatically start the calculation of the flight path in a few seconds after the user stops editing the route. The status of the calculation will be displayed as the Route’s calculation indicator on the Route’s card.
When the route is successfully calculated (green checkmark) it can be Uploaded to the vehicle.
To take off, Arm the vehicle and turn on Auto flight mode.
IMPORTANT! Operation procedures differ for each vehicle type. E.g. some of them may start from the ground, others require manual take-off to a safe altitude. Please read carefully the vehicle operation guide. Pilot MUST know how to act in emergencies at all times.
Note: safety is always the responsibility of the pilot!!!
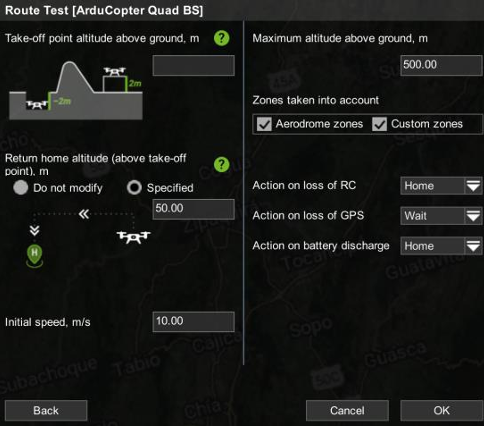
After selecting Create a Route from Scratch and choosing the proper Vehicle profile, a window will appear to configure the main parameters for the Route.
The numbers inputs here will change some internal parameters of the drone once the route is uploaded to the flight controller:
1. Take-off Point Altitude Above Ground
- This parameter takes into account whether the drone will be taking off from below (e.g., from a hole) or above (e.g., from a table) the landing zone ground.
2. Return Home Altitude
- The drone will hover to this altitude anytime the RTL (Return to Launch) flight mode is engaged (after finishing a flight plan, activated by the pilot, after triggering a failsafe, etc.).
3. Initial Speed
- This parameter will set the cruise speed to be held when flying the flight plan.
4. Maximum Altitude Above Ground
- This parameter sets an altitude above ground limit that the drone would never exceed.
5. Action on Loss of RC
- Sets the action the drone will follow in the event of losing RC (Radio Control) signal.
6. Action on Loss of GPS
- Sets the action the drone will follow in the event of losing GPS signal.
7. Action on Battery Discharge
- Sets the action the drone will follow when the battery voltage drops below the limit.
When filling up the main Route parameters, the recently created Route panel will appear at the top left corner of the Main Window.
Generic Flight Plan Generation
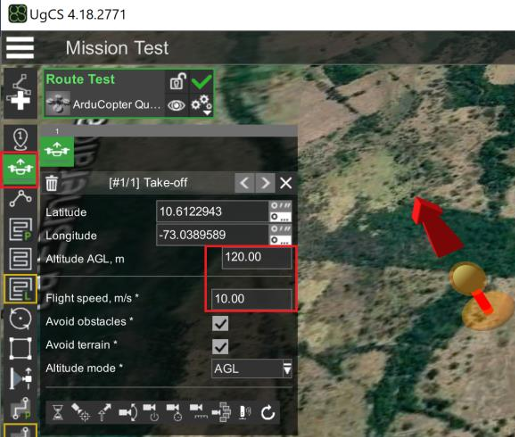
- To add a Takeoff event, choose the Takeoff icon at the Route toolbar on the left, double click on the desired takeoff point on the map, and fill the Takeoff altitude (by default the altitude mode is AGL), and the flight speed set after reaching the altitude. The Takeoff is an instruction for the drone to reach certain altitude, so it does not matter if the selected Takeoff point on the map does not lays exactly where the drone is finally taking off.
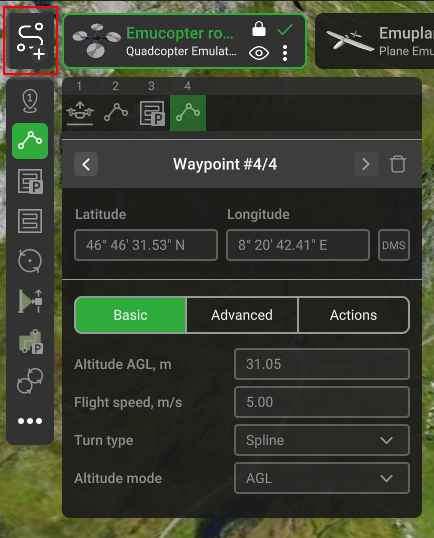
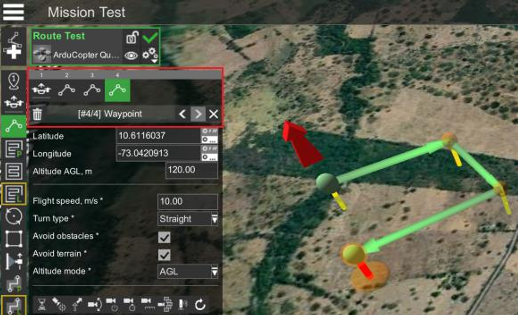
- To add a Waypoint event, choose the Waypoint icon at the Route toolbar on the left, double click on the desired waypoint point on the map, and fill the Waypoint altitude, the flight speed set after reaching the waypoint, and the turn type when reaching the waypoint (Stright or Spline).
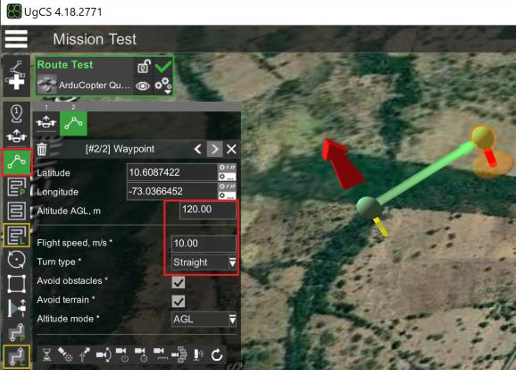
- The user can navigate and reconfigure the waypoints by clicking on the right/left arrows. Alternatively, the user can click on the waypoint represented on the map as yellow balls, and use the move and drag arrows to change the position or the altitude.
Generation of Flight Plan for Mapping
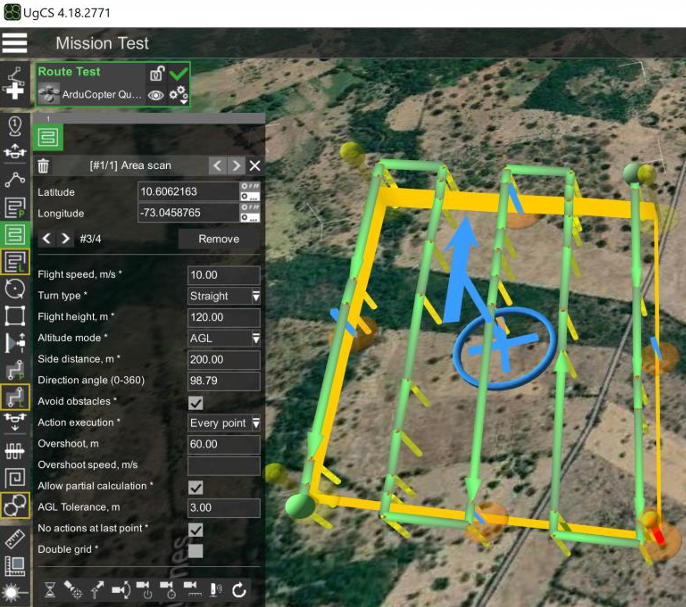
- To create the flight polygon, choose the Area Scan icon at the Route toolbar on the left, and then fill the desired mapping params as Flight speed and Flight height.
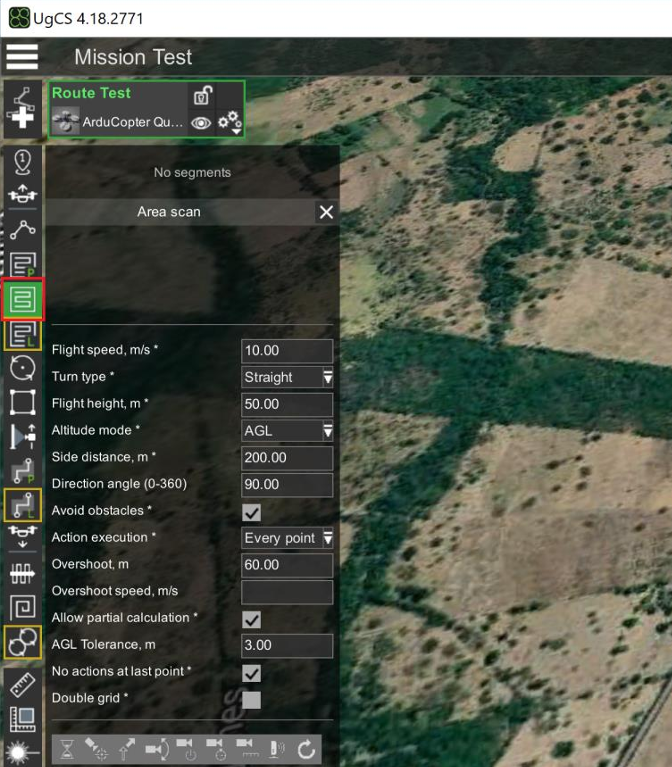
- Double click on the map to create as many flight polygon corners as needed and right click at any position to close it. Once created, the user can use the move and drag icons, at the corners and at in the center, to translate and shape the polygon.
- Now it is time to adjust the AGL Tolerance parameter. This parameter controls how many waypoints will be inserted along each segments. If AGL Tolerance is set to 5, for instance, a new waypoint will be inserted every time a 5m altitude change is detected along the segment. Anytime this parameter change, after clicking Enter, wait for the segments to update the number of waypoints.

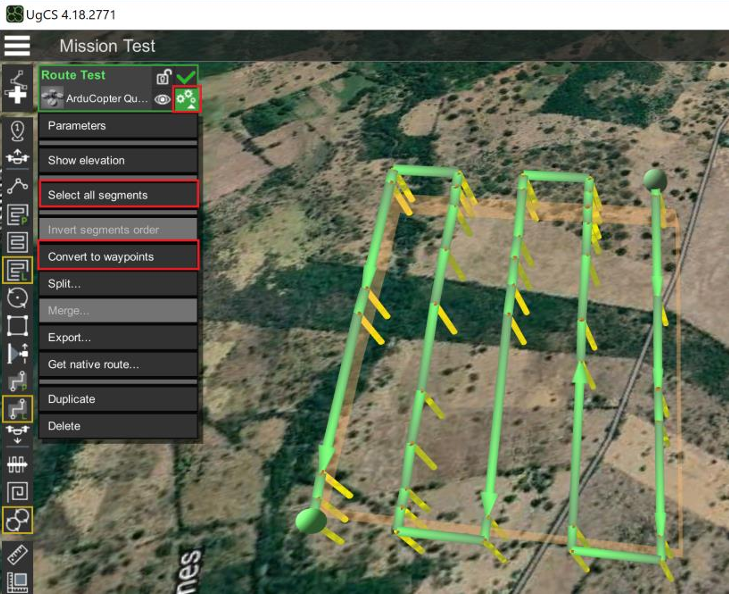
- In the previous step, a flight plan based of segments was created, but to have better control on the flight plan, it is better to transform the segments to waypoints. In order to do that, first of all, click on the Route Parameters icon (three gears) at the current Route icon and then click on Sleect all segments, and finally click on Convert to Waypoints.
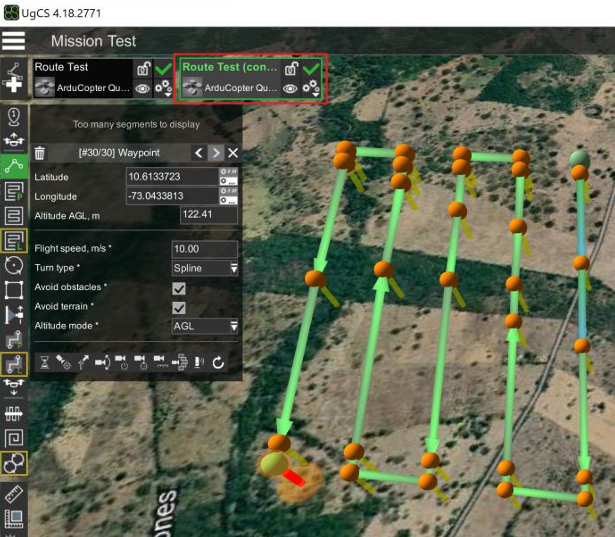
- Once the waypoint conversion is done, the new converted Route will be added at the top left corner. Notice that now, this Route is a collection of editable waypoints.
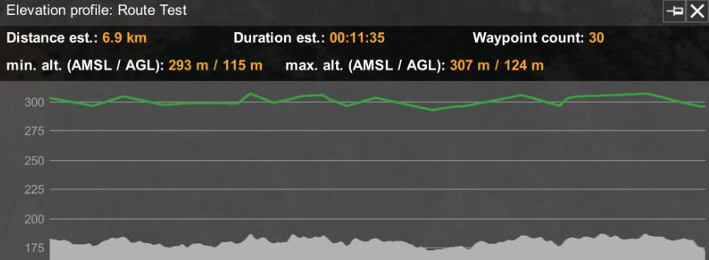
- To check the flight elevation of any Route, either based on segment or based on waypoints, click on the Route Parameters icon, and then click on Show Elevation, Make sure the green line is always above the terrain.